200 Watt Vapes
Hello there. Today for a review, I got the GBOX Squonk kit from Geekvape. So I actually had no idea that a Geekvape was even making mods now, but they are and this isn't their only one. So this GBOX goes up to 200 watts. It's a dual 18650 regulated mod. It also does temperature control, nickel, titanium, stainless steel. There's bypass mode, so you can turn it basically into an unregulated mod, but it will still have safety features. You can adjust TCR settings and even create a custom power


Video Transcript: GeekVape GBOX 200W TC Squonk Kit with Radar RDA / Review & Coil Installation by Zophie Vapes
Hello there. Today for a review, I got the GBOX Squonk kit from Geekvape. So I actually had no idea that a Geekvape was even making mods now, but they are and this isn't their only one. So this GBOX goes up to 200 watts. It's a dual 18650 regulated mod. It also does temperature control, nickel, titanium, stainless steel. There's bypass mode, so you can turn it basically into an unregulated mod, but it will still have safety features. You can adjust TCR settings and even create a custom power curve. And this will come with the radar RDA. It's got a pretty cool deck. It's so simple to build on. So, next up, I'm just gonna show you guys this thing, how to use the mod, toss a couple of coils on there and then I'll be back. And I do have an extra one for giveaway, but the giveaway is gonna be on my Instagram.
The GBOX came in this really plain box. It just says GBOX Squonk Kit, Geekvape over here and that's it. Inside the box is this little baggy. There's a tri-tool, a bunch of extra o-rings. This right here is a 510 drip tip adapter. You get a bunch of extra screws and a regular 510 pin. Inside of here, there is an additional squonk bottle. And these are not really the squishy kind. They're firmer. So with this you get this fancy pantsy looking USB cable. If you pull this down, there's your micro-USB, and up here is a lightning cable. So I'm not gonna recommend using this to charge your mod. You can, and it also does have pass-through charging, but I just think it's better for the mod and the battery if you use an external battery charger. However, this is great for firmware updates.
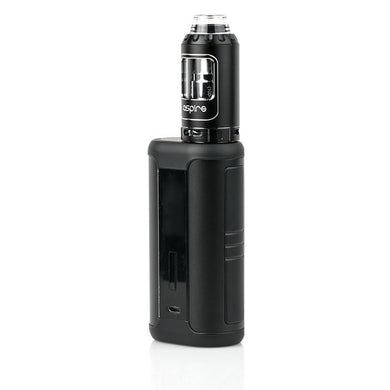
Here's the GBOX. So this goes up to 200 watts. Right here is the fire button, this is the OLED screen, plus and minus buttons, and the USB port. At the top, there's a 510 spring loaded connection. On the bottom, there's the battery door cover, that just opens like this. The mod holds two 18650 batteries, which are not included, and to remove the squonk bottle, just comes out like this. So, the screen on this is actually pretty dim. I had to fiddle around with my camera settings so you guys can see it better. Right now, I don't have an atomizer on here. I just quickly wanna show you guys how to use the mod. Right now, I am in wattage mode. So, on the screen you can see the wattage displayed. There's a battery life indicator for each battery. It'll show the resistance of the coil once I put an atty on here. There're amps, voltage, you can see when you're vaping, and there's also a puff counter.
If you click the plus and minus buttons, it can go up and down in wattage, and this does go all the way up to 200 watts. And taking it in the other direction, it'll go all the way down to 5 watts. So it may look like I haven't used the mod, but it was used in last night's video, so I have used it. I just accidentally reset the puff counter. So how you set that or I mean reset it, you click the fire button three times, one, two, three, and you'll see power, the word power turns to white. Click the fire button again. And now, using the plus and minus buttons I can reset this, but it's at zero. If you wanna go back, so you can adjust the wattage, you just wait till it goes away. And now I can adjust my wattage again.
But there's more than just wattage on here. Again, click the fire button three times, one, two, three. Goes to white, now using the plus and minus buttons I can select temperature control. So, there's nickel, stainless steel, and titanium. Up here, once this turns from white to black, I can adjust my temperature in increments of 10 degrees Fahrenheit. And it does go up to 600 degrees Fahrenheit, and then it switches to Celsius. On Celsius it goes up and down in increments of five degrees all the way to 315. If you keep going, it switches back to Fahrenheit. So once I have my temperature where I want it, I can also adjust the wattage in temperature control mode. So, again, one, two, three. This turns white, click the fire button and here you can adjust wattage, and this goes all the way up to 80 watts.
So, one, two, three, moving right along. Next one is TCR, Temperature Coefficient of Resistance. So if I click on that, I can adjust wattage and I can also adjust TCR. And the very last one is resetting the puff counter. So the one after that VPC, this is a custom power curve, and you do get five of these little notches. So, one, two, three, I gotta get this back to white and if I click on the fire button, I can adjust each and every one of these using the plus and minus buttons. So it will go as high as 200 watts, click the fire button again, and you can create this curve. So, I can do that for each and every one of these five.
Next one over, and this is bypass. It turns it into an unregulated mod. So this is only for advanced users. And back to wattage and that's it. And lastly here is the RDA that they included with this. It's called the Radar. Here's a look at the bottom. That little pin right there, that just removes the negative posts in case you wanna clean this out, and at the very top, you have an 810 Delrin drip tip pin. This is removable, and it's also GOON style. And there is a second Delrin drip tip, which is taller. Stick this on my mod, remove that top cap, and this does come apart. So this part right here will control the airflow. Stick it back on here, you can see what I'm talking about.
So as I'm playing around with it, and you do also have an option like this, it's doing the same thing on the other side. So, this RDA is designed for two coils. And here's a look at that deck. Kinda looks crazy, but it's actually really easy to build on. However that juice well does appear to be kinda shallow. So, I'm gonna quickly toss a couple of coils on here. First loosen up those screws. So here's some more coils that I picked up at a convention, KALM coils, look at those. They are fancy pantsy looking. Kirk, dude, you gotta get a website, could not find one for you. This is all the contact information I have. Here, his email and Instagram. So first I'm just gonna cut these down a little bit 'cause the leads are kinda long. So next, I'm gonna stick my coils through here, one here, one in that hole, and you can see when I do that, they come out the other side.
So next I'm gonna tighten down this coil and I'm gonna plop in that second coil and do the same thing. So as long as the leads aren't touching anything else, you really don't need to trim them, but I'm gonna. So next, I'm just gonna try to straighten out these coils a little bit. And you also wanna make sure that the side of them isn't touching any metals. So now you can see nothing is touching metal. And another reason you want this on here is to make sure that you can see that coil through the airflow. So it looks like one of mine is a little bit higher than the others. I wanna bring this one down a little bit. Alright, so now they do appear to be at the same level.
Once you place a new atomizer on the mod, it's gonna ask you if it's a new coil or one you were previously using, so new and now I'm gonna set my wattage, oh, I don't know, I usually do it around 30-35 watts. There you go, 35 watts. And I just lightly pulse the coils to see if they're heating up correctly, and usually they will not right off the bat, that's pretty normal. What I'm checking for is hot spots, and I also wanna make sure that the coil's heating up evenly from the inside out. So as I'm doing this, I take some ceramic tweezers and I kinda pinch the coils. And make sure they're ceramic; you don't wanna use metal. And if you do happen to see any hot spots, there'll be red lines across the coil. You can just take your tweezers and lightly strum the coils.
So once again, I'm gonna use some Native Wicks Platinum Blend, and this stuff comes like this. So I do have to cut off a piece. So with this stuff I stretch it out a little bit so I can twist it and stick it through my coil. So I'm gonna clip this to about the bottom of the atomizer, and then taking some tweezers, needle-nose tweezers, I fluff out the ends. I removed some of that cotton. Spruce it up a little bit and then stick it into the deck.
So Geekvape also sent me this bottle that holds 30 milliliters of e-liquid. As you can see, the Mod juice is in here, and you can use this as a regular e-liquid bottle by unscrewing this. But before I put e-liquid on my coils, I need to fill up this. I don't wanna take my bottle out, so I'm gonna take this off. So yeah, just like your atomizer, gently fall down to the floor. So next thing, I'm gonna take this top portion of the bottle. So if you unscrew it here, you unscrew this whole thing, that's how you get e-liquid into it. So put that back on there and just take off this part. So this, screw right into here, and make sure you're using your bottom-feeding mod. I guess that's kinda obvious.
So there's a trick to this bottle. What you do, push this in. Push it, flip it, and at the same time, I do squeeze on this. I just think it works better. So now you can see, if I squeeze on that bottle down below, e-liquid will come up. So this is one way I can saturate my wicks, or just to help them out since they're brand new, pour some e-liquid out of my fancy pantsy $30 bottle right here. And I can also fire my coils to get that e-liquid more into there.
So there it is. The GBOX and the Radar RDA. It was so simple, tossing some coils on there. Kind of like the drop where you just basically drop them in, tighten them down, and that's it-skis. I think building on this was actually even easier than building on the drop. So big, big pro to that deck. However, I think I would have liked to see that juice well a little bit deeper. I think it's only like 5 millimeters, so when you're squonking, do be careful not to over-squonk. And I will say, I do like the way this mod squonks. It juices up my wicks really quickly. I also like that the radar it comes with two different drip tips. I am using the taller one. There's also this GOON style one, and they even include a 510 drip tip adapter. I do like seeing that. However, I do like using taller drip tips just to get away from those coils, because with shorter ones sometimes you get spit back, especially if you put too much e-liquid in there.
So as you can see, this RDA does chuck a nice cloud. And flavor, it's pretty good outta there. I mean, it's decent. It's not the best RDA I've ever had, but that's also gonna depend on the kind of build that you stuff in there. The kind of coil, the kind of wire, and even cotton. So the GBOX, I will say it, I do like the GBOX. It's kinda nice to have a dual 18650 regulated squonk mod, and it's also really easy to use. It didn't come with a manual. Hopefully the retail version will, but there was nothing in there besides what I showed you guys. But even so, never having used a Geekvape mod in the past, it was really easy to figure out how to maneuver around. There's wattage mode, temperature control, TCR bypass mode. You can even create custom power curves. Well, one custom power curve. However, there's only five little notches that you can adjust. I think they could have put in a little bit more; at least 10.
So it is a really big mod, but it's still comfortable in my hand. It's got that squonk bottle on the side right here. I don't like the way you have to take it out, because every time I take out the bottle, the batteries fall out. So I think access to the bottle should have been from the outside. But I do like that battery door. I haven't had any issues with that staying in place. So very good. The only other thing I don't like about this mod: That screen. I think it's kinda dim. It's got this tinted plastic over it making it more dim than it actually is. Indoors, you're gonna see it just fine, but if you take it outside, you might have an issue. I don't know why companies do this. I guess, 'cause they just like the way it looks. But, it makes it too dim. And, the last con I have with it, and it's not the mod, it's that bottle. I actually, really do like this mod, and I love the way it squonks, but, those bottles. I wish they were squishy, this is that harder plastic, not the nice silicone, squishy ones. So, if they could offer other bottles, that would be fantastic. But, on the plus side, they do give you two of them.
Alright. So, that completes my review. I don't have a giveaway on here this time, but there will be one on Instagram, for both of these things. You can win a $30 bottle and the GBOX. The GBOX on the Geekvape website is going for around $88. That's for the whole kit, with the RDA. However, you can also find them in other places, like MyVpro, I think they have it for like, 80 bucks. VaporDNA is gonna be carrying this stuff, Heaven Gifts, Ave40 and, those last two, they do ship worldwide and I also have some coupon codes down below in the video's description. Alrighty guys. So, that is it, that completes my review. And, if you guys wanna find me elsewhere, I'm also on Facebook, Twitter or Instagram, and my other channel called Just Sophie. Bye, guys.